Arduino - Turn on and off LED with a push button | Code and Diagrams
In this tutorial, we'll learn how to control an LED using a push button with an Arduino. We'll go through the circuit diagram, the components required, and the Arduino code. By the end of this tutorial, you'll understand how to set up the circuit and write the code to control an LED using a push button, including debouncing to prevent flickering.
Components Required
- Arduino Uno R3
- Pushbutton
- 220 Ω Resistor
- Red LED
- 680 Ω Resistor
- Breadboard and jumper wires
Circuit Diagram
Below is the circuit diagram showing the connections for our project:
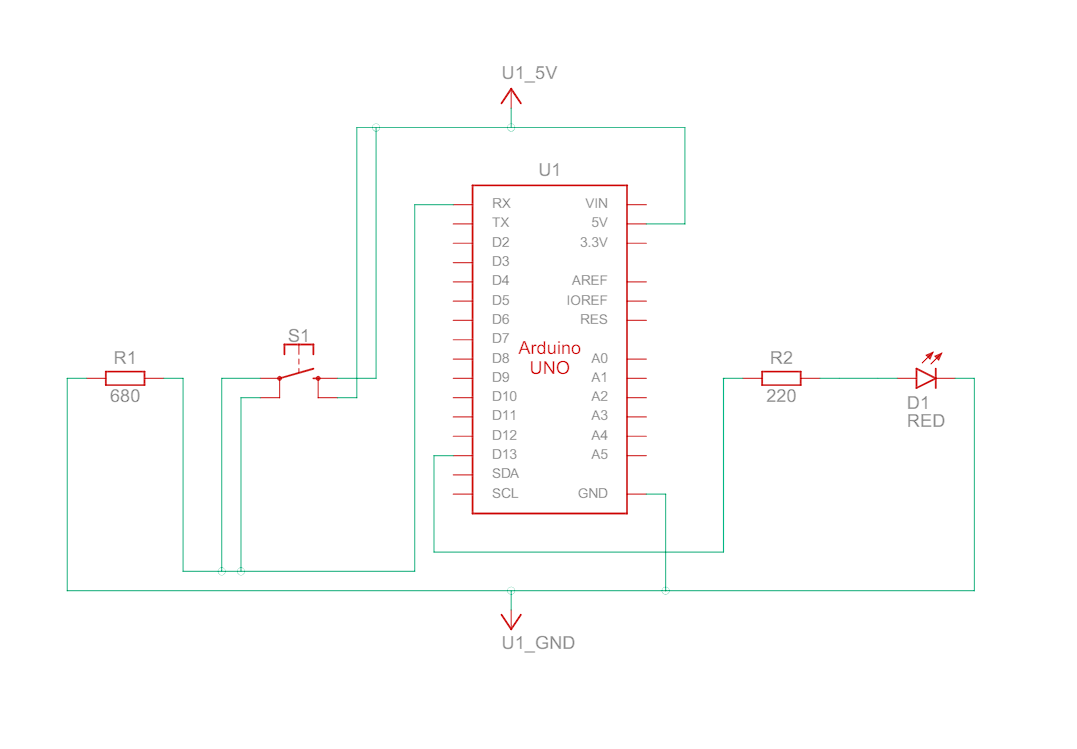
Circuit Description
- Push Button: Connected to pin D0 of the Arduino.
- Built-in LED: The built-in LED (connected to pin D13) is used for this project.
- 680 Ω Resistor (R1): Acts as a pull-down resistor for the push button to ensure the input pin reads a stable LOW signal when the button is not pressed.
- 220 Ω Resistor (R2): Connected in series with the LED to limit the current flowing through the LED, protecting it from excessive current.
Arduino Code
// Arduino Code for Switching ON/OFF an LED with a Push Button

#define led LED_BUILTIN // Using Arduino's Built-in LED, also Pin D13
#define pb 0 // Push Button on Pin D0 of Arduino

bool state, isPressed; // Boolean Variables to store button state and if the button is still pressed.

void setup() {
  pinMode(led, OUTPUT); // Set LED pin as Output
  pinMode(pb, INPUT); // Set Push Button pin as Input
}

void loop() {
  if(digitalRead(pb)) { // Read Button State
    if(!isPressed) { // Check if button is pressed for more than one cycle, it prevents fast switching of LED.
      isPressed = true; // This disables switching state in the next cycle if the button is still pressed, preventing flickering.
      state = !state; // Toggle LED state
    }
  } else {
    isPressed = false; // Reset isPressed to false when the button is released
  }

  digitalWrite(led, state); // Write state to LED
}
Code Breakdown
Define Constants and Variables:
#define led LED_BUILTIN // Using Arduino's Built-in LED, also Pin D13
#define pb 0 // Push Button on Pin D0 of Arduino

bool state, isPressed; // Boolean Variables to store button state and if the button is still pressed.
We define constants for the LED and push button pins. We also declare boolean variables state to store the LED's state and isPressed to handle button debouncing.
Setup Function:
void setup() {
  pinMode(led, OUTPUT); // Set LED pin as Output
  pinMode(pb, INPUT); // Set Push Button pin as Input
}
Loop Function:
void loop() {
  if(digitalRead(pb)) { // Read Button State
    if(!isPressed) { // Check if button is pressed for more than one cycle, it prevents fast switching of LED.
      isPressed = true; // This disables switching state in the next cycle if the button is still pressed, preventing flickering.
      state = !state; // Toggle LED state
    }
  } else {
    isPressed = false; // Reset isPressed to false when the button is released
  }

  digitalWrite(led, state); // Write state to LED
}
- Reading Button State: digitalRead(pb) checks if the push button is pressed.
- Debouncing Logic: If the button is pressed and isPressed is false, we set isPressed to true to indicate the button has been pressed. This prevents multiple toggles due to noise.
- Toggling LED State: state = !state toggles the LED state.
- Resetting isPressed: When the button is released, isPressed is reset to false.
- Updating LED State: digitalWrite(led, state) sets the LED to the current state.
Conclusion
In this tutorial, we learned how to control an LED using a push button with an Arduino, including handling debouncing to prevent flickering. We covered the necessary components, the circuit diagram, and the Arduino code. By following this tutorial, you should be able to set up the circuit and write the code to control an LED using a push button effectively. If you liked this tutorial, you can check our other tutorials here.