Arduino - Program RGB LED | Full Code & Circuit Diagram
In this tutorial, we will learn how to control an RGB LED using an Arduino. An RGB LED can emit different colors by mixing red, green, and blue light. We'll use the Arduino to control the intensity of each color to produce various colors.
Components Required
- Arduino Uno R3
- RGB LED
- 220 Ω Resistors (3 pieces)
- Breadboard and jumper wires

Circuit Diagram
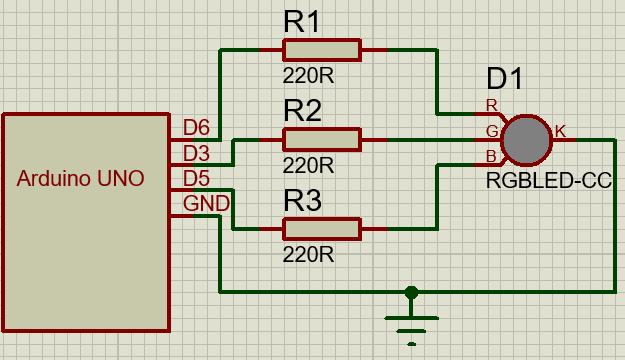
Below is the circuit diagram for connecting the RGB LED to the Arduino:
Circuit Description
RGB LED: The RGB LED has four pins - one for each color (Red, Green, Blue) and a common cathode (K).
Resistors: Each color pin (R, G, B) is connected to the Arduino through a 220 Ω resistor to limit the current.
Arduino Pins: The red, green, and blue pins of the LED are connected to PWM-capable pins on the Arduino (D6, D3, and D5, respectively).
Arduino Code
Here is the Arduino code to control the RGB LED. This code will cycle through three colors: Pink, Teal, and Orange.
// Arduino Code for Controlling an RGB LED

#define red 6    // PWM pin for connecting to Red Pin of LED
#define blue 5   // PWM pin for connecting to Blue Pin of LED
#define green 3  // PWM pin for connecting to Green Pin of LED

char color1[3] = {0xFF, 0xC0, 0xCB}; // Pink color (HEX: #FFC0CB)
char color2[3] = {0x66, 0xB2, 0xB2}; // Teal color (HEX: #66B2B2)
char color3[3] = {0xFF, 0xA5, 0x00}; // Orange color (HEX: #FFA500)

void setup() {
  // Set pins as Output
  pinMode(red, OUTPUT);
  pinMode(green, OUTPUT);
  pinMode(blue, OUTPUT);
}

void loop() {
  analogWrite(red, color1[0]);   // Update LED with values from color1 array
  analogWrite(green, color1[1]);
  analogWrite(blue, color1[2]);
  delay(1000); // wait for a second

  analogWrite(red, color2[0]);   // Change color to color2
  analogWrite(green, color2[1]);
  analogWrite(blue, color2[2]);
  delay(1000); // wait for a second

  analogWrite(red, color3[0]);   // Change color to color3
  analogWrite(green, color3[1]);
  analogWrite(blue, color3[2]);
  delay(1000); // wait for a second and loop back to the first color
}
Explanation
Pin Definitions: We define the PWM-capable pins on the Arduino for the red, green, and blue components of the RGB LED.
Color Definitions: We use character arrays to store the hex values of the colors. Each array contains three values representing the red, green, and blue components of the color.
Setup Function: The setup() function sets the defined pins as output pins.
Loop Function:The loop() function cycles through the defined colors. For each color, we use analogWrite() to set the intensity of each color component of the LED and then wait for one second before moving to the next color.
Advanced Code:
Here is a more advanced code that cycles through a variety of other colors:
//Arduino Code for Controlling an RGB LED

char pins[3] = {6, 3, 5}; //Pin 6 for Red led, Pin 3 for green Led, Pin 5 for blue led

char color1[3] = {0xFF, 0xC0, 0xCB}; /*Used to Store color Hex
                                    for Example color Pink has HEX: #FFC0CB
                                    which can be Stored as 0xFF - RED, 0xC0 - Green, 0xCB - Blue where "0x" tells compiler to use HEX format*/
char color2[3] = {0x66, 0xb2, 0xb2}; // #66B2B2 - Teal Color Hex
char color3[3] = {0xFF, 0xA5, 0x00}; //#FFA500 - Orange

void setup() {
  //Set pins as Output
  for (int i; i < 3; i++){ //Using a for loop for setting all required pins as output with one line of code
    pinMode(pins[i], OUTPUT);
  }
}

void changeColor(char color[3]) { //Custom Function to change color of led
  for (int i; i < 3; i++){
      analogWrite(pins[i], color[i]); //update pin[i] from pins Array with color[i] from the array forwarded as parameter to function.
  }
}

void loop() {
  changeColor(color1);
  delay(1000);
  changeColor(color2);
  delay(1000);
  changeColor(color3);
  delay(1000);
}
Conclusion
In this tutorial, we learned how to control an RGB LED with an Arduino. We built the circuit using an RGB LED, resistors, and an Arduino, and wrote the code to cycle through three different colors. If you are intrested, check out our other tutorials here