Arduino - Control LED Brightness with a Potentiometer
In this article, we will guide you through creating an Arduino circuit that allows you to control the brightness of an LED using a potentiometer. This is a great beginner project to understand the basics of analog input and PWM (Pulse Width Modulation) output in Arduino.
Components Needed
- Arduino UNO
- LED (Red)
- 220 Ohm Resistor
- Potentiometer (250k Ohm)
- Breadboard and Connecting Wires.

Circuit Diagram

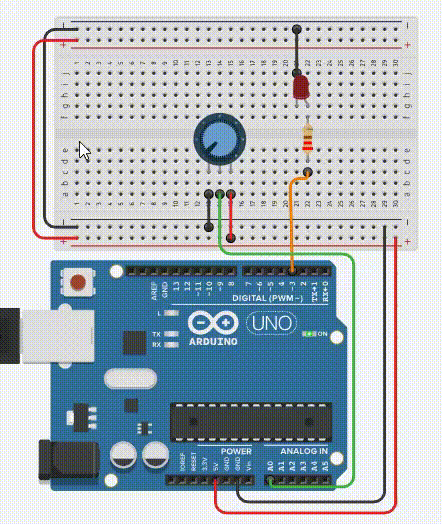
Circuit Explanation
LED and Resistor:
- Connect the anode (longer leg) of the LED to digital pin 3 (D3) on the Arduino through a 220-ohm resistor. This limits the current to prevent the LED from burning out.
- Connect the cathode (shorter leg) of the LED to the ground (GND) on the Arduino.
Potentiometer:
- Connect the middle terminal of the potentiometer to analog pin A0 on the Arduino.
- Connect one of the outer terminals to 5V and the other outer terminal to GND.
Arduino Code
Below is the Arduino code to control the brightness of the LED using the potentiometer.
Basic Code
//Arduino Code for controlling LED brightness with Potentiometer
#define pot A0  //Potentiometer Connected to pin A0
#define led 3 //Led connected to PWM pin D3

int potRead; //Variable for Storing Reading of Potentiometer

void setup() {
     pinMode(pot, INPUT); //setting pins as input & output
      pinMode(led, OUTPUT);
}

void loop() {
    potRead = analogRead(A0); //Read analog input at A0 and store in potRead variable
      analogWrite(led, potRead / 4); //Write analog value to PWM pin D3
      //NOTE: AnalogWrite has 8Bit value input ranging from 0-255
    //So we divide potRead by 4, because its 10bit Value ranging 0-1023.
}
Optimized Code
//Arduino Code for controlling LED brightness with Potentiometer

#define pot A0  //Potentiometer Connected to pin A0
#define led 3 //Led connected to PWM pin D3


void setup() {
     pinMode(pot, INPUT); //setting pins as input & output
      pinMode(led, OUTPUT);
}

void loop() {
    analogWrite(led, analogRead(A0) / 4); //Read analog input at A0 and Write analog value to PWM pin D3
      //NOTE: AnalogWrite has 8Bit value input ranging from 0-255
    //So we divide potRead by 4, because its 10bit Value ranging 0-1023.
}
How It Works
- The potentiometer acts as a variable resistor. When you rotate the knob, it changes the resistance and thus the voltage read by the analog pin A0.
- The analogRead() function reads the voltage (0-5V) on pin A0 and returns a value between 0 and 1023.
- The analogWrite() function writes a PWM signal to the LED, with values between 0 (off) and 255 (full brightness). Since analogRead() returns a value up to 1023, we divide it by 4 to fit into the 8-bit range expected by analogWrite().
Conclusion
By following this guide, you can control the brightness of an LED using a potentiometer with an Arduino. This project introduces you to the basics of analog inputs and PWM outputs, which are fundamental concepts in many Arduino projects. Experiment with different resistors and LEDs to see how they affect the circuit, and try modifying the code to enhance your understanding.